Tuesday, December 28, 2010

Blohm und Voss P.212.02 - part 14

All done!

I managed to get this thing done before the year ended! :)

Anyway, here are some posterity shots:


If you'd like to try building my model, you can download the diagrams here.

Now to start thinking of my new design.....

Thursday, December 23, 2010

Blohm und Voss P.212.02 - part 13

And after a long, long pause, I'm proud to say that the Eric Flugzeugwerk's machines have started churning again.

I've finally got to start that final build.

I'm not done yet, but here are some preview shots:


All that's left are the landing gears and the bay covers. :)

Sunday, October 24, 2010

Blohm und Voss P.212.02 - part 12

And I'm happy to say the camo job is officially over! :)

Here are some posterity shots:
I recycled the landing gear textures from my Heinkel P.1078 model.  No point in reinventing the wheel...heheheh.


The wheel wells on this plane are quite spacious.  I had to take extra effort to add additional details.

Finally, the exhausts...nothing much here.

Here's a small preview of the unfolded parts, ready for assembly.


Now all that's left to do is to make that final build.  After that, I'll have to make some basic instructions before releasing this model.
:)

Saturday, October 23, 2010

Blohm und Voss P.212.02 - part 11

Almost there!


Just need to finish the landing gears.  After that, I'll be ready for the final build.

Sunday, October 17, 2010

Blohm und Voss P.212.02 - part 10

Very little progress today. :(

Here's what I've got:
Making those rivet marks on the wing at up a lot of time.  (Of course...washing and waxing the car too... :) )

Saturday, October 16, 2010

Blohm und Voss P.212.02 - part 09

A little progress on the paint job.  I'm not sure if I mentioned this before, but I'm going to pattern the paint job after Erich Hartmann's plane.  Hartmann's plane is famous for its black tulip nose pattern.

Being a big fan of Erich Hartmann, I've always wanted to create a Luft46 airplane that bears his paint job.

So far, I've finished doing the fuselage:
More tomorrow. :)

Sunday, October 10, 2010

Blohm und Voss P.212.02 - part 08

Some finishing touches.... the landing gears and the wheel well covers.
Nothing mucht to show here.  Just your garden variety generic landing gears.

And...after a long delay, the first prototype rolls out of the factory doors.  I proudly present my design of the Blohm und Voss P.121.02 fighter:  


I'm now working on skinning the model.  More updates next week!


Sunday, October 3, 2010

Blohm und Voss P.212.02 - part 07

I can't believe I forgot to assemble the front wheel well!  Grrrr!

Oh well...

Next to wing and body formers, wheel wells are the most difficult part of the fuselage to assemble due to the tight/snug fit.  I usually assemble the wheel wells first and wrap the fuselage around them.  In this model, I completely forgot to do this for the front wheel well.

SO, in assembling this, I ditched the idea of using glue tabs and tried to attach the edges of the well well walls by butt-joining them. (See picture above.)

The absence of the glue tab bulges should make the task of squeezing in the wheel well a lot easier.

Messy! :(

I'll end my weekend build by attaching the canopy.

Saturday, October 2, 2010

Blohm und Voss P.212.02 - part 06

Finally, some real progress!  :)

I started off with making the engine intakes.
The engine intakes comprises 5 parts.  Those "wavy patterns" you see are the valley/mountain fold markes added by Pepakura.  They'll disappear once I add the textures later on.

Here's how it looks like when completed.  Notice that the printed side is rolled inwards. 


Next up is the parts for the engine exhaust. 

Good fit so far.


The rest of the fuselage parts are pretty much standard fare.   The picture above shows the finished components that comprise the fuselage.


Assembly starts with the front most parts.  I attached the first 4 components (seen from the left of the fifth picture above).  Before attaching the next component, I affixed the engine intakes.


Here's another shot of how the engine intakes look after attached to the fuselage.


Now comes the hard part.  The rear wheel wells were a bit hard to fit. 


Fuselage done!

Before calling it a night, I tried to dry-fit the wings.


Yeah!  Hehehehe.... Fits perfectly!
The horizontal bars you saw on some of the formers worked in ensuring that the dihedrals of the wings are angled correctly.


Man those wings are big....


Here's a shot of the wheel wells.

That's all for now...


Monday, September 27, 2010

Blohm und Voss P.212.02 - part 06

And so the test build has begun....
I started by cutting out and assembling the wing formers.  Save for a minor problem cutting out the slots, everything went along smoothly.  I must confess though.  I used more than the usual amount of CA glue to stiffen the wing spars.


Here's how the wing is 'wrapped' around the wing formers.  Pretty good fit! :)

Here's how the wing tip is wrapped around its formers.

Wing, nacelle and wingtip ready to be put together!


The nacelle is first attached to the wing.   The nacelle fits rather well.  Unfortunately, the nacelle was a bit hard to assemble...

Finally, here's what the completed wing looks like.

That's all for now I guess....

Sunday, September 19, 2010

Blohm und Voss P.212.02 - part 05

Done with unfolding via Pepakura!  I was expecting another unfolding nightmare like that of my last model (Heinkel P.1078b).  Surprisingly, this one unfolded pretty well.  I guess the simple fuselage shape and the constant chord wings made unfolding easy.

Here's a preview of how the parts will look like:


Yarrrr!!!! Thar bee cone petals on the engine spinner and the wing nacelles!  A necessary evil, I say.  Yarrr!

Unfortunately, the weekend is over.  I'll have to wait till next weekend to do that test build.

Sunday, September 12, 2010

Blohm und Voss P.212.02 - part 04

I can't believe how slow my progress is!  I must pick up the pace one way or another...

Anyway, here's what I have so far.

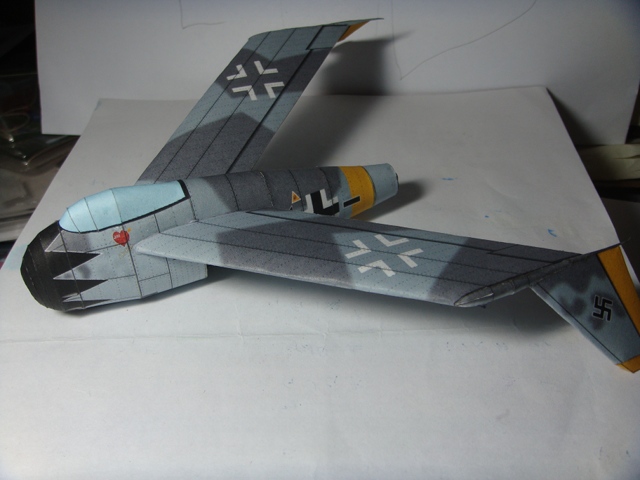
First, the nacelle at the wing tips.

If you recall from my previous post, the nacelle was a bit 'fat'.  In fact, it looked more like a fuel tank!  According to the 3-view diagrams over at the Luft'46 site, the nacelle should have been 'flush' with the wing tip.

And so I labored for many hours trying to find the best way to make the nacelle fit the open edge of the wing tip.

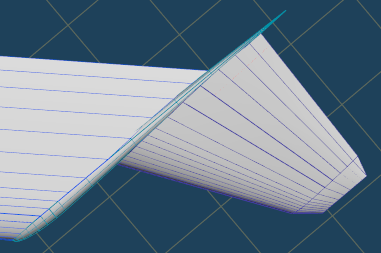
And here's what I got:
So far so good!  Much better than the previous design.  Most of the time spent for this was to align the segments of the nacelle with a corresponding segment on the wing.  Doing this will help Metaseq produce a cleaner result by the time I do a boolean operation (Wing minus Nacelle).

Now my problem is that the nacelles are a bit on the narrow side.  Almost like landing gear struts.  If this ends up being hard to assemble, I may bump up the scale to 1:32.  For now, I'm sticking with 1:48.

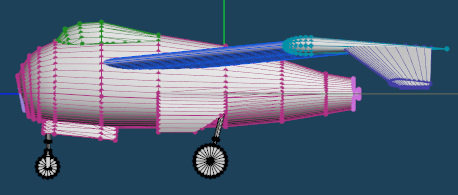
Next, I spent the rest of the weekend making the formers:
The fuselage formers (yellow) were relatively straightforward to make.  Unfortunately, I can't say the same for the wing formers.  The wing formers required a lot of work.  Due to the dihedral of the wing, I couldn't just slice away with the knife tool to make the spars.  I had to do some basic trigonometric calculations to derive the wing angle.  Once I got the angle, I created a couple of plane primitives, which I then tilted to intersect the wings at 90 degrees.  After that, I did a boolean operation to intersect the tilted plane with the wing to produce the cross cut which would later be used to make the spars. 

Boy... I guess my high school trigonometry class had some use after all! Hehehehe.

Thursday, September 2, 2010

Blohm und Voss P.212.02 - part 03

A little fine tuning on the wheel wells just to make sure they're big enough to accomodate the landing gears.
Note that the front landing gear has to twist 90 degrees before folding in.  This due to the space occupied by the engine intake tunnel.  On later jet designs, the intake will bifurcate to accomodate the pilot space and the landing gear.  (e.g. Mig 15)

Monday, August 30, 2010

Blohm und Voss P.212.02 - part 02

Done with the wheel wells and landing gears.
Here are some pictures:

Notice how the engine intake tunnel is visible from the rear wheel wells.  Man..that was tough to make in Metaseq!


Next step, boolean operations for the Wings!